Thursday 20 December 2018

Phasor Phun


So, turns out I had forgot one of the more important parts of a VNA's function, that it outputs Phasor values, that is vector-like quantities with defined phase and magnitude used to represent sinusoids.

Related image
Sadly not our favourite Star Trek ray guns...

So why do we use this form of data?
  1. The VNA is already providing information in a frequency sweep - every data point represents a sinusoid of a specific frequency.
  2. A sinusoid can be represented with three bits of information, its frequency, its magnitude and its phase offset.
  3. Therefore, given we already have frequency we can easily store the other two bits of information as a phasor and be quite happy!
  4. Phasors lend themselves quite well to multiplication/division operations - addition/subtraction is achievable after a simple conversion to rectangular (Cartesian) coordinates.
Of course to simply represent our two quantities as two different elements of a vector would be too nasty - we use imaginary numbers instead, in exponential form.

This realisation gives me the opportunity to work with way information than before. By taking phase into account when comparing two signals we can identify more properties to identify them, for instance phase differences, or absolute magnitude differences.

Clearly at this point I am sitting on top of a folder bursting with graphs (3D graphs!!), however they need a bit more work before anyone but me will understand them so I will save them for later...

Thursday 29 November 2018

Further Engineering Excitement

 So a follow on from the previous post, mainly because I ran a second set of tests, but this time transmitting around 10GHz.

As before I hooked a nice polarised antenna up to the lab VNA and moved a pipe around in front of it, while looking at the power reflected into the VNA from the antenna (and calibrating out the power literally reflected by the antenna itself to try and isolate the reflections due to the pipe). Of course being 4th year engineering means that all of this is automated after the initial setup!

I had a few predictions about this second set of tests:
  1. Our lovely dominating sinusoid (the one with the increasing and decreasing reflectivity) would increase in (spatial) frequency to match our increase in RF frequency.
  2. The sample would induce a greater reflection as its size (in RF wavelengths) was now bigger.
  3. The tail end of the previous reflectivity graph started to look flatter, I was expecting this flat region to develop earlier on in the graph
Of these only 1. turned out to be true, the increase in size relative to wavelength of the sample appears to have been swamped by greater path loss, the radiation losing energy as it travels, which is greater at higher frequencies. Additionally the flat area did not appear, making me suspicious that its manifestation in the earlier graph was an artifact of me 'under-sampling' the distance/reflectivity waveform.

My pipes at this point were about a wavelength wide (as opposed to the half-wavelength width they have for 5 GHz waves) which has another important part of the test as my trusty textbook had illustrated that the reflectivity properties change around this point (and a bit lower). This appears to have been observed, certainly the PVC pipe appears to now be reflecting more power when it is horizontal, earlier it was reflecting marginally more when it was vertical. The metal pipe appears to be reflecting equal amounts of power independent of its orientation - which is interesting and requires further investigation...

Anyway, the results graphs:

Reflectivity Graph, now pointier...
FFT plot, also pointier
One of the brilliant bits about these experiments is that they produce megabytes of information, the two graphs here only use a fraction of the data produced. This means that there are many, many, many different ways the data can be displayed and different properties that can be explored ... brilliant news for at-home-playing-around-in-matlab me!

Thursday 22 November 2018

Engineering Excitement (or: more MATLAB graphs and FFT fun...)

So, end of the degree means that some fairly cool research gets to be done to produce a thesis. My project has ended up being trying to explore the effects of a cylinders orientation with respect to RF (Radio Frequency electromagnetic radiation) wave polarisation on their RF reflectivity. A bit of a mouthful that ends up with: can I find a method to detect pipes really easily? If I can that would be really useful for the construction of pipe-detecting devices. The really cool bit was that initial research indicated that dielectric (non-metal) cylinders also exhibited properties along these lines, which is really intriguing, and could represent a massive improvement over current methods of pipe detection.

So a couple of months of reading and simulation later I found myself in the lab collecting data from a physical experiment, the results of which are below. For this test I had a plastic and a metal pipe which I rotated between vertical and horizontal in the testing apparatus. My investigation had indicated that 
Data!!!!
This graph shows the approximate power reflected from a set of sample cylinders at varying distances from a test antenna hooked up to a VNA (meaning I was actually looking at the total power reflected from the antenna).

Two points, firstly I can be fairly certain the figure above shows power reflected due to the samples as there is another set of data that was collected with no sample in the testing apparatus - this established how much power was being reflected from (and into) the antenna under no-sample conditions. This power was subtracted from the result of tests when there was a sample to give the result displayed.

'But Wait!' I hear you say, 'you have negative power over there!'. I have cheated and used a dB, logarithmic, scale to display the results. Negative readings actually indicate that less power than the no-sample test was reflected under these conditions. This is due to RF wizardry, at these points the sample has put itself somewhere where it can absorb lots of power (or lead to it not being reflected into the measurement device), rather than reflecting it (into the antenna where hopefully the measurement device can detect it). This is a combination of the sample 'coupling' with the antenna, changing its characteristics, and it being close enough to provide an effective load to the transmission line the antenna is attached to! (I did say wizardry)

Secondly, the y, distance, axis is approximate - there is some offset which I have not accurately measured yet, unfortunately Lab-Me only took down a rough measurement! Additionally it is the nature of a lot of RF work that there is a certain level of roughness to results. This is mainly as the measurements we take are affected by all RF radiation waves being thrown about, including are own, that like to interfere with each other, themselves and reflect, refract and diffract off of whatever they can. This leaves us with a non-trivial system that is always going to have an element of randomness simply because we cannot predict everything that is going to be important to the behaviour of the system. The best that can be done is to try and calibrate all of our measurements to a baseline and then not change the test environment if we can help it. This is why the measurements all look very messy - luckily this data set represents about one of 640 (from this experiment alone) I can use to help reveal how the effects I am looking for are affecting the system! Additionally I have another antenna set made up able to look at a different set of frequencies (these tests were conducted at about 5GHz).

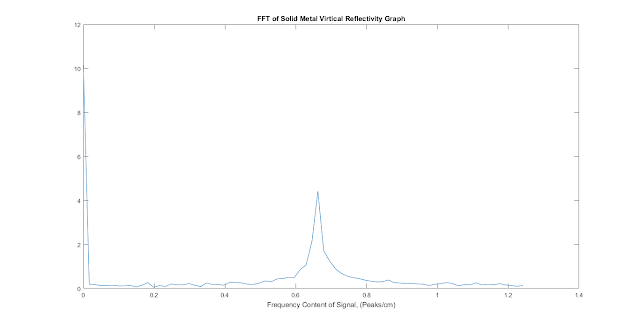
I got really interested in the oscillations in the data so, naturally, I ran a quick Fourier transform on the data to uncover its frequency content. Note that this frequency is separate from the frequency of the RF operation, it is actually the frequency of reflective peaks over the separation distance.

MOAR DATA!!! (ignore the vertical scale)
Unfortunately for those trying to avoid confusion, the frequency plot shows a definite peak at just over 0.3333333 Peaks/cm, or a wavelength (distance between two peaks) of just under 3 cm. Why is this interesting: because the wavelength of the RF radiation used to produce this graph was just under 6cm! In other words the sample reflects the most power when the sample-antenna separation is some multiple (plus an offset) of half the RF wavelength!

It is always nice to get results that indicate more investigation is needed!

Monday 15 October 2018

Robot Wars, Level Up!

On to the next crazy project!

I suppose I should begin this post with an update on Gigaton Handshake: Optional Ultimatum (Giga to its friends). The last post saw the completion of the CAD design and I can happily report that is has now been built, wired, tester, rewired and is looking forward to its final tests/fixes a full two months before the next competition here at the uni. Does this mean that we are going to sit on our hands for a full two months waiting for action? Of course not, and unfortunately that means we shall start with a digression.
Gigaton Handshake
Evil cat time, high backed chair slowly rotating... flash of lighting!
"MWAHAHAHA"
"Sit on our hands! Sit ... on ... our ... handssssss??"

Long story short my fellow roboteers and I have decided to try and design/build/program our own robot control system/board. Hopefully this will end up being lighter and more compact than the current menagerie of various commercial boards we use. The plan is to use them to put together a three bot cluster (three robots in the same entry), as well as allow us to build many, many more normal bots.

As a project this has been rather interesting so far, it took us ages to come up with the correct design requirements but once we had them the rest of the design has gone quite well. We broke down our requirements as follows: 

The board was determined to have to be able to:
  • Be powered from a lithium polymer cell with an input voltage range of 3.5V to 14V to allow 1-3 cell li-po batteries to be used.
  • Control 2 DC brushed motors directly with 2V/Vbatt continuous current draw
  • Supply control signals and power to two servos with 200mA/5V current draw.
  • Receive and process human commands into servo/motor outputs.
  • Human must be remote from board (commands must be transmitted wirelessly)
  • Wireless communication must be able to penetrate 5mm polycarbonate
  • The board must have an interface to allow its firmware to be updated
  • There were a bunch of size requirements too to ensure that we were actually getting an improvement with the new board.
The next step was to determine the system architecture and hardware that could realise these aims. Initially the plan was to use a discrete micro-controller, RF transceiver, motor controller, and power regulator however after much discussion we managed to address the functionality of the first two with an ESP32 board.

The selection of the ESP32 was quite an interesting process as initially we had lined up to use two chips, an ATMega328p micro-controller and Si4463 sub-GHz RF tranciever. Our reasoning was that the AtMega chip met all of our requirements and could be programmed with the Arduino bootloader, allowing us to use the Arduino IDE and libraries which makes the embedded code much easier to develop. Additionally the Si4463 was similar to the CC110Ls used during the Blake Project, and at sub 1-GHz we were going to run into RF weirdness during PCB design, but not too much.
My group member had got to a late stage in the PCB design before we swapped over to the ESP deivce, partially due to both our dawning horror at what the AtMega and Si4463 would require to get working. My group member was having serious concerns about the challenge in routing all of the signals between the two devices and to the transceiver's antenna while keeping to board to a reasonable size. I was having second thoughts having done some preliminary work designing a wireless protocol as an improvement on my naive effort during the Blake project (one specific improvement being not crashing whenever a single packet was lost). The work I had put together in preparation had already filled many sheets of paper with flow charts but I was still unsure of its effectiveness, or even its ability to be implemented. Finally both of us had realised that we were going to have issues with the Si4463 as we would need to create another device from scratch to allow a human to generate the RF transmissions.

The ESP32 device we chose had several major features that fixed most of these issues. Firstly it combined the transceiver and micro-controller and implemented all of the RF circuitry, making the PCB design much easier. It also has the ability to communicate via Bluetooth (classic and low energy). This means that we get a full communications stack given to us with all interactions happening at the application layer, much less of a headache than the PHY level interface the Si4463 was offering! Using Bluetooth also means that we can use the transceivers in our phones to communicate rather than having to build new hardware ... once we learn how to build Android applications ...


Gathering mist and darkness, spooky castle fades into the background, maniacal laughter slowly dying away...

Back to Gigaton Handshake which went together fairly well, the uni's student workshop had some brilliant metal cutting tools for the front armour plate which meant I was able to cut a couple of spares, just in case. The 3D print went well, the new uni printers work like a dream. Initial construction was surprisingly painless (amazing how good things can get when you actually plan them) and only required one revision after initial testing.
The issue was, in true what-can-go-wrong style, electrical. When I had wired up the robot initially it had both the drive motors and radio receiver powered from a couple of power regulators on the brushless motor controller board. This worked really well until the motors tried to draw a lot of current, for example trying to turn really fast from a standstill. This drew all of the available current (about 3A) from the power regulators and starved the receiver, which promptly crashed. Luckily this was a problem with a quick fix and the motors are now powered directly from the battery, which has a larger possible current output of ~20A, before exploding.

The brushless motor works with relatively little fuss, the blade needed to be roughly balanced before I was happy using 100% throttle, this was done with a piece of string and a file.
Giga, a view of the other side a bit emptier as it usually holds the battery
(which is currently staying in its lipo safe)
 This robot is now roughly finished, with only a couple of improvements. The first is to add the now distinctive drinks can blade to the front to increase scoopiness. The second will be to take a file to a couple of the edges to try and get the maximum dimensions down a bit. The third, possibly more important step will be to hot glue all of the components down to the chassis, with about 50g space weight I am hoping that I can use enough glue to almost act as impact softeners shielding the electronics from sharp blows when the robot is thrown about. The final step will be to upgrade the wheels.
Given I have lots of spare mass to play around with the wheels are going to be triple layered with alternating MDF and Perspex pieces. The idea is that putting MDF on the ends of the wheel will allow it to absorb spinner hits while the central perspex layer will provide a bit of rigidity. The final innovation is to add teeth to the outside of the wheel, these are not to grip the arena floor themselves, but to grip a layer of rubbery plastic that will be added later which should increase the wheel grip dramatically. Like all good 2D components these will be cut on the laser cutter at Uni.
Cad rendering of the wheel design, blue will be MDF, red will be perspex.

Thursday 11 October 2018

200mm Scope: Drinking Straw Successor

The Drinking Straw successor is complete! which means,  I actually completed a project I set out to do ... in a reasonable time.
Complete!


Mandatory down the barrel shot

The ingenious 'double eyepiece location' - which hopefully will mean that I never have to pull off a feat of gymnastics to reach the eyepiece!


Please, hide your surprise.

As a recap, I have wanted to upgrade my smaller 76mm scope (the drinking straw) for a while since it became obvious that I had reached the limits of its capabilities. A couple of Ebay trips later and this step up had defined itself as a 200mm Newtonian reflector (given that I had a 200mm parabolic mirror).

One of the trickiest things to do with the drinking straw was keep it stable and non-shakey. This was largely due to the equatorial mount I opted for, firstly my own hideous creation, and then due to the properly made one being very, very heavy. The mount did have its benefits, like allowing for simple RA/Dec pointing and target tracking, and I enjoy using it. The thought of trying to replicate/use something similar, but scaled up for the 8 inch mirror, made my inner engineer very happy - but would not have been feasible in a device I could use in a reasonable timeframe, and also move around. Next time, next time. Instead I opted to follow the instructions from Stellafane on 'How to build a Dobsonian' given that I had already read the guide several times, it was easy to read with lots of information, and it seemed to be a bombproof way of getting a usable instrument.

So, onto a brief summary of the build - including interesting happenings, blinding insights and banal construction descriptions. In my previous post I talked about the design process which should have made it clear that I was deviating from the standard concrete pouring tube Dobsonian somewhat. Experiences with getting the length and balance point of the Drinking Straw wrong, repeatedly meant that I wanted to keep these properties of the tube as adjustable as possible. My solution was to have the optical tube made of three boxes all sliding along a set of poles. The three boxes held the mirror, interfaced with the mount, and held the secondary mirror/focusser/eyepiece respectively.
The design, with three boxes.
The build began with the mirror cell - which went together beautifully after I had managed to find all the bits (the springs were hard to track down, I ended up using RS having tried at least a dozen different hardware stores). At this point I think it would be good to add that I was beyond the range of the lovely laser cutter and its friends, but I did have access to my Dad's tool collection including a brilliant jigsaw.
The mirror cell, part of the way through construction (the pole holes are yet to be cut and the side mirror supports have not yet been added.)
The next step was to start building the boxes. My initial plan was to have boards perpendicular to the optical axis (with holes cut in them) as structural braces/imitation baffles, the box would then be made of four rectangles of plywood on the sides, held together primarily by the braces. This did not quite work out, which I will talk about later.

The Braces were my first attempt at cutting circles with the Jigsaw which I knew was going to be critical to making the Altitude bearings later on. I did my late night research into how people generally cut circles with a jigsaw and came up with a very useful jig-saw jig which constrained the blade to a circular path. Unfortunately for the first few boards to have their holes cut it took me a while to figure out how to keep the Jigsaw blade straight.

Jig saw circle jig, idea scooped from a random YouTube video

A not so successful circle cut.

After cutting the braces out it was time for the far simpler sides of the box - these were just rectangles with some pre-drilled holes to guide the various screws and nails that held the box together.

The next step involved a bit of improvisation. I may have mentioned before that I did not really know hoe I was going to secure the poles in place when I initially designed the telescope. Eventually I cam the the plan of using hose clips secured around a plank of wood (itself secured to the box) that could be used to keep the poles still relative to the box, while still allowing the poles to be released for taking the telescope apart. It turned out that this was a brilliant idea, not because it held the poles securely, it turned out that friction against the braces and sides did a good enough job of that, but because the planks of wood did a far better job of holding the boxes together than the braces!

The first box constructed (which would turn into the pivot box)
Another thing that developed during construction was the finish of the wood used. I knew I wanted to use some sort of wood-stain on the wooden elements of the telescope to weatherproof it, and because I did not like the idea of paint. The final wood-stain used was one I found at the back of a shelf in the garage, supposedly a 'natural oak' colour. So far it has worked quite well.

Next up was throwing together a secondary mirror spider/holder, here I just drilled some holes in an 18mm thick scrap of Plywood for push/pull bolts to go through to tilt the mirror. the spider was a set of steel bracket strips that I bent into shape. The entire assembly manages to stay behind the secondary mirror (from the perspective of the primary mirror) and the steel strips are edge on to the light path while still being quite thick. It is a solution that works well enough for the moment and holds the secondary mirror dead still, but will probably require upgrading in the future. as it is not particularly easy to use the push pull bolts.
The secondary mirror spider, with nice curved vanes. The mirror holder was just a block of wood with some holes drilled in it. I sandwiched some nuts on one side of the wood using a 5mm wood scrap to give each bolt hole a durable thread.

Another view.
The rocker box, altitude bearings and ground plate went together in a couple of days (surprisingly quickly). The altitude bearings took all of my skill at cutting round objects with a jig saw to the limit, but they came out spookily well. The biggest improvement came after I changed to a slightly thicker blade which seemed to wander less easily.

One of the trickiest bits about this last stage was deciding on different wood thicknesses, the process of choosing the other dimensions already has a lot of guidance on the internet. In the end I used:

  • 18mm for the bearings and sides (to maximise the bearing contact area), 
  • 5mm for the front (to save weight, the front does not have to take much concentrated force that would require thicker wood), 
  • 9mm for the bottom of the rocker box and ground board (as it was the only material I had left in sufficient quantity)
  • 12mm for reinforcement on the bottom of the ground board.
To protect the ground board from excess moisture and also to give a good set of contact points I screwed three cheap plastic castor dishes (turned upside down) to the bottom of the ground board too, so far these have worked really well.

Test fitting everything in the bearing/rocker box/ground board assembly before coating with wood stain.

Finally there were a couple of later improvements, I added braces to keep the altitude bearings straight and added nonstick pads and laminate to each of the bearings to improve the movement action. The work with the bearings would have been included as part of the rocker box assembly but I was initially quite happy with the simple wood on wood bearing, it took a couple of evenings for my mind to change.
The rocker box all finished, you can just about make out the altitude bearing braces.
Overall this has been an enjoyable project with a concrete outcome, it was a matter of minutes before the 200mm scope was showing things invisible to the 76mm scope on the first night of viewing. Unfortunately it will be staying at home while I travel to Uni but I can still continue to work on bits and pieces for it, I already have my sights set on making a finder of some sort to help navigate around the sky. Additionally eagle eyed readers may have noticed the somewhat gargantuan secondary mirror, which is almost two cm to wide (across the minor axis). At some point I will get around to replacing it with a more appropriate mirror.

Saturday 2 June 2018

200mm telescope: The Drinking Straw Successor

So - I have managed to secure to optical components for a nice 8 inch telescope with the plan to put one together over the summer.

While I am really excited to see what the new telescopes capabilities will be (the focal length of the primary mirror is not that much longer than the one in my 76mm scope so most of the benefit will be in extra light gathering capability) I am almost more excited about the construction project. Given that this will be a summer project I will be away from the University and its many CAM machines. On the one hand this is good as it means I can use materials that would catch fire in a laser cutter, but it also means that all manufacturing will need to be done by hand!

Counter-intuitively, this lack of laser cutter makes the design step even more important - because correcting mistakes is going to be a pain! Therefore, armed with some idea sketches and optical dimensions I threw together an Inventor assembly to try and get the dimensions right, and usable.

The profile shot, I have a couple of objects for scale (all disabled at the moment lol). They showed that the telescope is going to be very usable, except it may need to be on a table if looking at object near the horizon!
More of a beauty shot, down the optical tube
The CAD work has been a bit of a learning exercise, playing around with texturing and movable joints, as well as how to best use the assembly system. The standout awesomeness was the fact that my Crayford Focusser design could be imported and tried around on the model to make sure it fitted!

Anyway, I am sure that there will be plenty more to talk about/take pictures of soon!


Tuesday 8 May 2018

Jupiter at oppositon

Doesn't look like much - until you realise the spots are moons! From left to right we have Ganymede, Io (hidden in Jupiter's glare), Jupiter, Jupiter again reflected off the camera lens, Europa and finally Callisto
So with Jupiter at its shiniest this evening, and the sky at its clearest I dragged my flatmates out to have a quick look through the telescope. One of them had his phone with him and managed to get this picture through the eyepiece! It is no Hubble image - but it does show the moons (three of them anyway).

Visually, the view was rather good, the banding was obvious, either the Southern or Northern Equatorial band (depending on how the image was being flipped in the telescope) was particularly prominent. The gradual upgrades to the 'scope are becoming obvious, the view is now far steadier than before which finally means that the view will stay still long enough to allow me to focus properly and to take advantage of any short periods of good seeing.

Friday 4 May 2018

Rubik's Cube Solver - Complete!


The group project is complete! With all 67 pages of report submitted and flashy hardware demonstrated nothing else is left to be done. 

So first up, some obligatory photos:
The Solver, in all its death-star-ness

The drama shot of the cube, the centre cube frame is used for holding colour calibration strips for the cameras and is held in place entirely using fishing wire

A resurrected version of our interim submission. We used it for demos during the presentation: wiring the servo into a lab signal generator which allowed us to demonstrate the cube actuation in a controlled (and not covered-in-wires)manner.
And an obligatory solving video:


Solving video!

In the end our gamble with the servos paid itself back, giving us a very high reliability, but rather long solve time. This contrasted well with other groups who had really quick solve times, but ended up with more frequent cube jammings.

My own major contribution to the final product was the design of a computer to cube communication system. One of the requirements put on us (to make things harder) was that we had to route all control signals through an audio cable which could not have any programmable devices after it to control motors. The design and implementation of this system has been one of the most enjoyable things I have done at uni so far - not least because I have reached a level of experience that means I can design basic circuits that work! Inputs to the audio cable were generated using a standard PC soundcard, which let me play with Python at one end, while demodulation was done with some pretty neat circuits at the other.
Signal flow diagram showing the modulation and demodulation of the information signal
 In order to increase the information carrying capacity of the communication system I decided to multiplex multiple signals on the audio cable in the frequency domain, which required a whole bunch of band-pass filters to de-multiplex again. To adequately understand how to send signals to the filters so that they would work properly (by sending them signals in their pass bands) I needed to do a frequency response test on them. To increase awesomeness, and make use of our shiny new lab equipment, I was able to do this entirely automatically, commanding and drawing data from an Oscilloscope and signal generator using MATLAB and an Ethernet cable!
Automatically produced graph of all the filters' frequency responses!
Finally (the funny bit at the end...) I got carried away with Inkscape during the closing stages of the project as we were preparing for presentations which meant that our group ended up with a 'logo'. Needless to say my courage was not up to putting it in the final report!

We were Group A. Yes, the image did start life as the Manhattan project seal.

Thursday 3 May 2018

Rubik's Cube Solver almost there

No pictures, no videos :( - just a hope for some in the near future!

The solver worked really well, and looked insanely cool. With the report due in soon the group has now turned its efforts to Arch Enemy no. 38: Documentation.

Like fools we decided now would be a brilliant time to trial-by-fire learn our way around LaTeX. A couple of thousand lines of code later, and 65 pages, and I think it worked.

Saturday 21 April 2018

Rubik's Cube solver - sooo close!

Rubik's cube update, final hand in is next week. Given that we then pretty much go straight into exams this deadline is final - which is strangely comforting.

The good thing is that it looks like we (my group) might actually hit the deadline! After integration tests at the end of last term showed some fairly serious errors we have spent the past week of work time tidying things up (to make sure we can see any loose wires, rather than misdiagnosing a bug), rigorously re-testing system components (so we know how they go wrong more precisely) and hastily adding an entire extra communication channel (my fault on that one :( ). This culminated in a complete detect and solve that only had one slight over-rotation of a cube face during one of the moves!

While there will certainly be a video posted in a short while, in the meantime some photos!

A graph of output voltage for various input signal amplitudes, each line is a set of amplitudes for a different communication frequency. As you can see only one set of communication gets through. This graph is kind of redundant, technically the  frequency response data (collected months ago) should be able to prove there is no cross-channel interference, however it made group members happy!

A neatened pile of wires. What? you say this is messy ... my reply would be "this is after we have tidied it!"

Having talked of tidyness, 'the horror... the horror...'


Friday 23 March 2018

Robot, now with armour

Following on from the explosive adventures of The Rock and A Hard Plaice I have designed a sturdier successor, with an active weapon.

In an unprecedented move I have planned everything out, to ensure that all components fit. The easiest/coolest way to do this was in Inventor - which means that even though the design is at an early stage, I have pictures! (I also used the design process to experiment with parametric/variable driven CAD)

Always have to have as many colours as possible - (`\'-'/` - how else are you going to tell components apart?)
Major improvements include:

  1. Armour, and not made of just paper
  2. Guaranteed room for all components!
  3. Exact wheel diameter tolerances
  4. The aforementioned weapon, hopefully this will not end with the robot tearing itself apart!

The weapon is planned to be a vertical bar spinner, acting in a similar fashion to a flipper. Through previous robot iterations (the venerable Big Wheels series and the more recent The Rock and A Hard Plaice) my fellow teammates and I have become adept at being able to have a very low front scoop, generally well below most of our competitors. Therefore hopefully what will happen is that this robot will ram its opponent, forcing the opponent up the front ramp and into the spinning blade. As the opposing robot will already have been scooped from the floor of the arena when it is hit by the bar it should recoil further (and fly further), while the forces through this robot will be more vertical, preventing it from also recoiling too far.

The name is still undecided for the moment, ideas include Gigaton Handshake, Coincidental Survivors or Bizarrely, Trifle.

Easter Roundup

As is the way of academic term time - things have been fairly busy recently! As a result I have missed writing posts about several different project events, so here they are, amalgamated into a mega post:

Blake Project:

Yes, we finally handed it in, presented at an outreach event and semi-satisfied our supervisors. We managed to automate one of the cars, dictating it's behaviour with a learning state machine. This solution required us to quietly ignore that the 'learning' involved the car loosing control and falling from the track!

The final system did not include the brilliant perspex track, unfortunately I was not able to get the rails to be smooth enough to maintain reliable electrical contact with the cars as they travelled!

GrAVITAS:

I reckon that I will need to rename this project "The Han Solo Memorial" given how often it has gone into hibernation. Since the last post I discovered major potential instabilities in the planned circuit design, which scrapped the planned layout. Then University projects happened and we find ourselves a couple of months in the future.

Luckily I have now extensively tested new signal chain components (as a lucky byproduct of aforementioned University projects) which should mean that the hardware is put together very soon (fingers crossed)...

Robots: The Rock and A Hard Plaice, I and II

A bit more action here, mostly due to the fact that the Rock and a Hard Plaice suffered almost 50% fatalities per entry into a competition.

They were a blast to drive, not least because with two drivers the clusterbot became quite a sociable thing. Sadly weight saving measures left both bots rather vulnerable to more destructive opponents the first iteration of The Rock I fell victim to a vertical saw blade that discovered the only thing guarding The Rock's flammable lipo battery was a sheet of decorative paper!
Hmmm - I didn't intentionally add a fire weapon...
Of course, a video: https://www.youtube.com/watch?v=aL26JNXmnOE
(Destruction at 2 minutes 15 seconds)

Naturally once wasn't enough so I went about redesigning the cluster bot to be slightly better armoured, and actually used a 3d printer (splutter, splutter) to produce the chassis! Somewhat undaunted by the fact that I was greeted at the next competition by "are you going to explode again" from some very excited organisers The Rock and a Hard Plaice II managed to not die at all.
Sturdier, right...
The next thing to do was to go a step too far, which I managed to do admirably by entering a public antweight robot wars event.

(destruction occurs at around 10 mins 30 seconds)

I think the best bit was that I could find enough pieces to reconstruct the chassis and had to consolidate the available hardware into a single zombie-bot:

In retrospect the decision to add the 'Hard Plaice' picture to the underside was somewhat disturbing...
 Rubik's Cube Solver:

Perhaps the most enjoyable project I have ever taken part in, the Rubik's Cube Solver has also been one of the most time consuming!

In the past few months I have been able to design, build, redesign, rebuild and debug the communications hardware and software for sending information over the mandated audio cable.

For those interested m hardware consisted of a Sallen-Key filter designed with the Analogue Devices filter wizard (all praise the filter wizard) with non inverting amplifiers acting as input and output impedance buffers. The actual demodulation was done with an envelope detector circuit. Modulation was done with software driving a PC soundcard.

Amusingly today was supposed to be the have-everything-working day for the project with a presentation next term. However not a single group managed to hit the deadline, mainly due to integration issues, which meant that the unit director pushed the deadline back in an act of supreme benevolence! My group was 99.999999% of the way to hitting the deadline before we discovered some rather tricky bugs involving envelope detector fall of times (yes ... that was my section) which we were unable to both generate and integrate a solution for in time.

Given the state of things I am sure that I will be able to post a victory video shortly...
The initially planned communications tower, my demodulator fits into the second lowest box. 

Cube as it is now, with illuminating LED's and blackened actuation rods.

Satisfyingly not much has changed in the solver structure, except for the addition of a fluorescent-bulb-blocking shade. While it is not the most aesthetically pleasing structure coming together in the lab I am happy with it as the open frame and intentionally forgiving design has allowed us to test multiple system elements and interfaces well before full integration

The interior of the Demodulator box, I think the wiring leaves much to be desired!


Aaaand ..... there we go all caught up. With three weeks of holiday coming up either many more posts are about to be made, or my next post will be in a couple of months time after the next academic term!


Friday 16 February 2018

Rubik's Cube ... Sphere

Hooray! Images from the Rubik's Cube project!

After many days of hard work from the team I am in we have finally completed the chassis for the solver, which will hold the cube, actuators and any electronics required. The idea when designing this chassis was to make the actuator mounts (these are the large empty boxes) as flexible as possible - meaning that we can build and test other subsystems (like cameras) before the motors and gearboxes are ready.

A quick note, this is my EEE degree's third year group project. Seeing that we are third years the project supervisor has decided to make things slightly harder - all communication to the chassis mounted electronics (and motors) has to be done via an audio cable, and we are not allowed programmable devices to decode the information from the cable. The team's solution to this involves a PC soundcard, lots of bandpass filters and a couple of basic ADCs to implement a simple analogue shift keying communication scheme with multiple sub channels separated in the frequency domain. The lack of programmable logic has left us having to control the actuating servos with one-hot logic, which slows down our solving speed considerably.
The cube sphere!
Three years of Engineering education put to good use in finding a way to hold the cube in place for camera testing. (Hot glue was also used)


Tuesday 13 February 2018

GrAVITAS - the circuit board

Ha! 
GrAVITAS returns - a bit worse for wear (having been stored in carbonite for so long). Work has finally got manageable enough for me to return to work on the solar flare detector. Actually, I lie - there were a couple of brilliant team members who persisted with their task, even when I went quiet on the subject, who galvanised me into action.

So, the progress:
1. Much software doings, it is only the scheduling and reporting that needs to be done. Having said that I have discovered (from other similar projects on the web) that NOAA publish the information from GOES-15's solar instruments, which would be brilliant to compare with the data we capture - and could be used entirely automatically.

2.I finally got around to the hardware, and have now planned out the analogue signal chain. Luckily due to the audio card digitising the signal, it does not have to be too complicated. A couple of buffers, amplifiers, a notch filter and a bandpass filter and everything is awesome! Needless to say, I expect the receiver to work terribly in this first iteration, but maybe by the fifth.... I think that while the design below does not include them I may end up adding a load of potentiometers in the place of some of the resistors to allow me to bodge optimise the circuit parameters!
My planned matrix board layout for the analogue signal chain. All go for soldering up on Thursday.
Hopefully I can post soon about even more progress, but I expect that my targets may slip - we have another Blake Project presentation opportunity this weekend which may eat a lot of time.

Wednesday 31 January 2018

Focuser Complete

The focuser is complete!

Actually it has been complete for a week, but I have been too busy enjoying the sky to post about it.

Turns out that I am not yet genius enough to design something to work first time just yet: during construction there were some improvisations I had to make with the original design that I will go through below.

Now that the focuser is working the difference in viewing quality is enormous. Being able to get the focus exactly (okay, not quite exactly) right without shaking the entire scope, as my friction fit focuser did, means that I can get sharp images without the telescope moving itself away from a target.

This will hopefully mean that I can finally start using the telescope to the limit of my optics. This is a welcome change from the limiting factor being something that I have done (or not done!).

The focuser
The focuser still needs a bit of touching up, at the moment the axle bar is a threaded rod which can lead to interesting interactions with the securing bolt and tends to shred the eyepiece holder. It is also 1mm too thin - I am probably going to take a quick trip to the hardware store soon to find a replacement and solve these issues.

Additionally, I managed to find a PVC plumbing fitting that fitted my required dimensions, but now is acting as a brilliant reflector of stray light into the eyepiece - I am going to have to paint it black at some point.

Finally my method of attaching the focuser to the scope can be seen above, it is not very pretty, but works well enough, for now. At some point in the future I may get around to improving the mounting mechanism.

Shot straight through the eyepiece slot. One of the things that did work were the four bearings which, due to a combination of brilliant datasheets from RS and the precision of the laser cutter, are precisely where they need to be.

The revised fastening mechanism. It seems to work quite well.
 One of the things that changed dramatically was the fastening mechanism. I turned out that I had not left enough room for the spring in my design. Looking around the web at other homemade focusers revealed that a surprising number simply used a bolt pressing on the axle to secure it. This also solves the longer term problem of the spring wearing out as the spring is now provided by the structure, it also saves me a wing nut for use in future projects.
I have epoxied a nut on the axle side of the back plate to hold the bolt, with a cannibalised section of the original pusher plate used to provide extra counter-torque on the nut. One of the problems that has arisen from the threaded rod being used as an axle is that it likes to move left to right (up-down in the photo above) when it is turned while under pressure from the bolt. This is usually fine, but can be a surprising pain.

Mirror holder - modified!
The final modification was probably the scariest, and is likely going to require more work in the future. Because the new focuser is about 3cm taller that my old loo-roll eyepiece holder, I needed to shorten the tube of the telescope by about this amount to move the focal point of the mirror. By pure chance, when I had originally put the tube together I had made the main spars out of two shorter sections of wood bolted together. This meant that shortening the tube was a simple matter of swapping out the shorter of the two pieces with an even shorter piece (as seen in the photo above). I was a bit sad to say goodbye to some of the last remaining original and reliable components of the telescope.
Unfortunately, because he tube shortening only occurred at one end, and the current setup does not allow me to slide the mount attachment point around, this has thrown the balance of the telescope off. Even with the proper mount, the front of the telescope really wants to drop. While I could revert to the old method of hanging a bag of rice from the mirror cell, I think that the longer term solution is going to be rebuilding the telescope tube assembly as this will also allow me to incorporate some of the lessons I have learn't (like having a movable pivot point).

One quick project down, how many more to go?


Thursday 18 January 2018

Telescope focuser

First post for the year is a surprise blast from the past: progress on the telescopes focuser - please try to hide that rolling of eyes.

So, almost a year after throwing the first bits of the telescope together I finally got into the mood to do some serious design work on the last major element of the telescope left - the eyepiece focuser.

Up until this point my eyepieces have been held in with friction and toilet rolls which is not to stable and does not allow for fine movements of the eyepiece. With the gradual upgrade in the other system components the focuser has finally become the weakest link.

A quick google search can show all sorts of brilliant designs - most of which have been made by someone else who is trying to sell them to you. Luckily there are also scattered articles of people making their own - generally with the a high level of ingenuity that most amateur telescope makers seem to possess by default.

In particular the ingenious Crayford focuser design, while used in high end commercial models, has been constructed in all sorts of ways including from assorted wood and plumbing scraps. That sounds like something I can do - especially when I have my trusty sidekick: Mr Laser-Cutter (its a double barrelled name).

I have just finished my CAD model ready for a workshop session sometime soon, which incidentally means I have pictures:

the focuser - note that my CAD skills are limited - I have not managed to put all my parts in an assembly to make the design look completely pretty.
The top view - hopefully the holes for the two bearing holders are visible on the left hand side of the image - the pressure will be applied with a spring pushing a pusher plate against the axle (which will happen on the right hand side of the image.

The pusher plate, I have tried to reduce its contact area with the rest of the focuser while maintaining its ability to stay straight by giving it the bowing in sides.