Thursday, 15 August 2019

Time to think about time....

With the RFID system on a postal adventure for the next few days I decided to give some thought to the T of ODOTS. (It is indeed, T time...)


As a timing system the ODOTS will need to be able to accurately (and to an extent, precisely) track the time at each of the recording stations. The microcontroller unit has the ability to track time to an extent by looking at its own clock (digital signal clock, a simple oscillator) but these tend to be rather inaccurate (because they don't need to be) and also loose track of time when you pull the plug. 

This is where an external clock chip comes in handy both having dedicated hardware ensuring that it is keeping time well, and the ability to run on a very small power supply, allowing it to be powered with a small coin cell while the rest of the system is having a plug-pull induced nap. As mentioned in the last post the proof of concept system is staying in DIP land to reduce required soldering complexity/need for PCBs, on top of this requirement I also wanted the chip to require a minimum of external components. Luckily the handiest chip to use is Maxim's DS1337(+) a brilliant little chip that not only satisfies my generational requirement to meme, but also already has drivers written for it (though I only learned this after getting halfway through writing my own).

Choosing the RTC with the power of 1337.
RTC (Real Time Clock) time will be synchronised with a computer, probably during initial setup and then periodically by some sort of Tech Wiz (capitals necessary), while the microcontroller will periodically re-align its own time estimate with the RTC's during operation. Ideally the update timing slack will be less than 10ms (about the maximum precision I could really expect from the RFID system). The RTC can generate interrupts on second boundaries (effectively showing the 0ms point for that second) which I will be exploiting to allow the Microcontroller to gain some sort of sub-second accuracy. 

The frequency of RTC referrals is interesting, ideally I want to keep the interval small (to prevent inaccuracy buildup), but not so small that referring to the RTC is the only thing the MCU has any time time to do. Initially I had thought 10 minutes would be good, but this would require the Microcontroller to set the next interrupt time after each referral, increasing the time each refferal takes. However, the RTC has inbuilt repeating alarm abilities, once every unit of time (once a second, once a minute e.c.t.) for the time being I will attempt to use the once a minute interrupt to see if this noticeably impacts performance for users. That throws as many 'this is going to cause more work in the future' flags as I have seen but oh well....

Wednesday, 14 August 2019

Standard Struggle (or how I learned to stop worrying and love NXP)

Part of the ODOTS project is about tackling the problems that other people wont want to, and I think that I have taken a month to do just that. Today I finally admitted defeat to NXP - if I want the ODOTS competitor timing cad to be a MIFARE device (which I do, they are ubiquitous, diverse and likely to be around for a while) I am going to need to use their Reader/Writer ICs. The bit that finally pushed me over the edge was the realisation that not using an NXP chip was going to doom me to having to run the authentication and encryption on the Micro-controller. A day of searching for a friendly application note/datasheet/tutorial showed up nothing.

Up to this point I had mostly worked out the firmware for the CR95HF (from ST Micro) up to the ISO14443a layer and was feeling like I was understanding how it all hung together (a good indication that you are about 10% of the way there). Unfortunately while the CR95HF is MIFARE Classic compliant it requires encryption and authentication to be handled by the host (the micro-controller), while NXP chips will take the bulk of the work off you conveniently meaning the task of encryption and authentication are not often tackled by the sorts of people that will leave behind handy code libraries and examples. Thus I could continue to try and write code to run MIFARE tags through the CR95HF, but it would be a significant piece of work with little benefit (in the short term) over just using an NXP device.

The beaten track beckons, so I am flipping into complete Arduino-friendly mode and using the MRFC522 chip that has a development board that has been mass produced to the point that you can pick them up for £5 from mystery-meat ebay and amazon sellers. My development article is coming from a more reputable source in the hope that it allows me to avoid the classic block-of-resin-with-solder-pads knockoff syndrome! With all RF and surface mount components handled by the wonder board most other components are going to be possible to do with through hole components (or DIP) - for that sweet sweet 90s look. this will also make it more straightforward to prototype and 'mass' produce proof of concept timing units for demonstrations. Naturally as the likelihood of the ODOTS actually being used goes up the more and more it will approach a single PCB, all surface mount, state. Additionally using a shady source RF board may make it tricky to prove that the device is not producing large amounts of EMI - so it will need to be replaced at some point.

Astro Meandering

It has been a while since my last astronomy post, having to spend all night studying tends to reduce sky watching activities. There have been several developments however.

The 200mm telescope has proved itself as a semi portable device, it was successfully dismantled and transported to Scotland by car where it was reconstructed with no ill effects. The de/construction process takes about 15 minutes and appears with not really change the required mirror tilts for columnation. The telescope was not actually used up there ( :( ) as Scotland in summer only really gets dark in the morning and the trip to Scotland was actually for an Orienteering carnival - something that generally requires the maximum amount of sleep possible!

One deconstruction/construction cycle later and the scope is now working back down south. I took it out for a quick test last night, the forecast promising clear sky and the moon offering a good target for finder alignment and focus testing. Of course the forecast did not include the predictable appearance of thin high altitude clouds after such a warm day so I only got to looking at the moon and a brief look at Andromeda before everything became obscured.

With a nice full(ish) moon I also had the opportunity to  test out my new phone's camera and the darkening filter I have had in my eyepiece box forever. I have put the nicest photos below, but be warned my skills are still low, I have yet to get the exposure settings right, and I really need to come up with a way of holding the phone that is not my hands so that I can fix the positioning of the camera aperture. There is however a marked improvement over using my old phone (not surprising) or the mighty 76 millimeters of the Drinking Straw, though I think the latter is more to do with mow much more stable the 200mm's mount is!
A full moon in a single image, showing some nice detail on the terminator (to the left).

No Moon-photograph session is complete without a photo of Tycho Crater.

Monday, 5 August 2019

ODOTS, the nitty gritty

Yesterday I posted about the next project lined up, the Open Design Orienteering Timing System - today I will attempt to go into a bit more depth about what I have done so far, including design choices.
The orange and white checkpoint flag hides, trying to ignore the now well trodden path that leads directly towards it...

To start off the entire system will just be a big RFID network, Orienteers will travel between RFID read/Writers collecting their ID's and timestamps which can then be used to determine who completed the course the fastest. Therefore the RFID stations need to be able to both read cards (to detect them) and then write to them, ideally in a short enough time span that the user does not notice. The first step in this project was to decide on a broad RFID standard that will provide this capability and have widely available components (and compatible tags).

RFID has a wide variety of implementations and the first discriminator is operating frequency. Lower frequencies (such as 125kHz) do not provide sufficient read/write capability (or memory) and are also on the verge of becoming antiquated (HITAG, NXP's standard for this frequency had its last update in 2007). Age could be seen as a boon, the technology is proven, however there is a risk that the ICs will stop being manufactured (not brilliant for availability) and there have been dramatic improvements in communication protocols in the recent past that newer technology will have been able to leverage.

Higher frequencies come with their own problems. RF design becomes harder, which would be an issue if I was to try and start designing my own PCB's. Another issue is that higher frequency spectrum becomes useful for other things too, there are increasing numbers of users all competing for spectrum access, interfering with each other or operating in protected bandwidth.

Therefore 13MHz RFID is a good compromise. The 13MHz standards are currently receiving a lot of love (NFC, contactless payments) and will therefore probably have supporting ICs around for the foreseeable future. 13MHz RF design is hard but not impossible/evil. 13MHz also means that we will have to try hard to become spectrally abusive, power output will be limited by the fact that any antenna we make cannot be well matched to a signal that has a wavelength of 10m. A quick look at the OFCOM band map shows that there are users of this spectrum, however there is specific spectrum usage set aside for Inductive Applications (aka Near Field Communications) and the other users are tolerant enough/wideband enough that the restrictions are not too bad - official testing may be required if the ODOTS were ever to go into widespread usage.

Again NXP loom large in the 13MHz protocol lists their NTAG and MIFARE standards form a large portion of the compliance advertisements for cards and transceivers. To be a rebellious engineer I immediately looked beyond NXP for my RFID chip, in the hope that a separate manufacturer would also be able to cater for non NXP communications if needed. In walks ST Microelectonics with their development boarded CR95HF. This strays off the beaten arduino-compatible path (which about sums up most of my software work so far), but has good higher level drivers - when I can get the basics working. ST Micro are also releasing some very tasty IC designs with capacitive (passive) tag detection. These will be a prime target for upgrading to in a couple of years time if the ODOTS works!
Don't worry LM741 - the fancy RF/digital chips will never have your charm.
I have just mentioned Arduino, so that probably gives my Microcontroller game away. I have opted for an ATMEGA to allow me to sneakily use the Arduino bootloader and maintain compatibility with the beginner friendly Arduino IDE. For all the embedded engineers currently crying about the injustice of it all the 'under the hood' code is written far more practically to ensure that is can fit in the ATMEGAs resources. Using the nice friendly IDE for the top level embedded software will hopefully mean that it remains accessible to anyone who wants to have a poke around. Additionally it will allow me to rely on the many tutorials on how to burn in the bootloader/program for when other people try to use my designs.
The legendary MSP430 got a brief consideration (Energia is nice), but unfortunately it just does not have quite enough memory.
Finally I have given some though to other parts of the design, using the ATMEGA is likely going to mean my Vpp will be 5V - pushing Lithium Ion batteries out of the window, luckily 9V batteries are a thing and if I can come up with a nice openable/resealable enclosure replacing them should not be too difficult. Real time clock options have been glanced at briefly, it looks like I may have to put multiple devices on the same SPI bus which would be really cool to do! The actual user interface is something that also needs to be thought about at this point too - the checkpoint interface is pretty simple but the data needs to be read off the card somehow. Luckily if I am using the ATMEGA chips I can 'just add USB ports' and have a RFID tag's contents read and spat off into a computer for displaying/recording.

Sunday, 4 August 2019

The Open Design Orienteering Timing System

Uni finished, the next step not yet begun - obviously time for a large project. I have been kicking around the idea of building a custom timing system for orienteering for a number of years, but I finally got around to setting aside some time and (possibly just as importantly) asking the Orienteering Foundation for funds to go off and buy development and evaluation hardware.

What is the aim of this project? To build a proof of concept low cost open design electronic timing system for  use in orienteering training and small events. For those unfamiliar with the sport an Orienteering race is effectively a cross country race with no streamers showing you where to go - so you have to use a map instead. Thus it becomes a challenge of navigating between checkpoints as fast a possible. 

An example course and map, around the southern side of the University of Bristol campus

Validation systems to ensure competitors actually visit all checkpoints or controls are essential in any races with any sort of stakes. While this used to be achieved with pin punches and bits of card, modern orienteering will use high performance electronic timing systems wherever possible. To newcomers this can often be a very good advertisement of our capabilities ad worthiness as a sport. Unfortunately the current solutions for electronic timing are incredibly expensive which poses issues for clubs starting up or clubs looking to deploy their timing systems in areas prone to theft. Therefore I have the grand plan of building the design (and software) for a low cost electronic timing system. The low cost will reduce the barriers that new clubs can face, while keeping the design open and accessible will allow contributions from other members of the orienteering community to change the capabilities of the system to their requirements.

The final goals are:
  • Have 100 competitors on a 20 checkpoint course for under £500.
  • Ensure top level designs and software are straightforward and accessible.
  • From a performance standpoint checkpoint registrations should ideally take <20ms at a range of under 0.5m, while competitors should have the ability to record as many checkpoints as possible. Orienteers, being used to current timing systems, will also require the checkpoint registration times to also be recorded to around centi-second accuracy over a course that could take 24 hours!
  • From a safety standpoint it would also be helpful if checkpoints remember who has visited them as this can help with search and rescue (if needed).
  • From an operational standpoint the entire system should still work if it has been submerged for a while in a nice wet bog.

To hit these goals 13MHz RFID communications work quite well, allowing competitors to carry around a couple of kilobytes of read/write memory in fairly weather proof packages while also allowing fast communication times on protocols that are likely to last for another decade or so (at least). So far I have been working with the CR95HF chip from ST Micro, which is multi-protocol and also has some ST written drivers for using it to talk to NFC cards which is pretty useful. I expect that eventually I will have to specify more stringent RFID tag requirements for compatibility (as in possibly a specific set of MIFARE standards) as supporting a wide range of tags looks to be beyond the abilities of the micro-controller being used. It also requires minimal external components for RF drivers which will be useful when I finally start thinking about PCBs.

Using an Arduino compatible chip is also good, as writing the top level code in the Arduino style will allow it to be read by beginners. Work over the past month trying to get the RFID drivers to compile onto the AtMega328 have shown me that the lower level 'under the hood' programming will be less friendly (just so that it can fit).

At some point I will also have to start thinking about timing tolerances and potentially Real Time Clocks, but for the moment all effort is being put towards getting the RFID systems to talk!

The most important part, a logo/icon for the ODOTS

An alternative name - and logo, I think I must have had the render settings set much lower for this one!
It is important to note that I enjoy using the current timing solutions a lot, which have been honed over a number of decades to provide reliable, painless timing with brilliant precision. Recent moves to contactless registrations have made passing through checkpoints very fluid and don't require any slowing down at all (brilliant if you are trying to live up to your internal image of running along like the the three hunters).

Wednesday, 24 July 2019

Starting on a Quest to Building a Music Player

Hi All!

I've recently gotten into the swing of libre software/hardware projects, and so am interested in designing a music player capable of playing ogg vorbis format music.

This is the rough set of requirements:
-Portable (roughly size of a smartphone/PDA, realistically smaller since it's not going to have much hardware other than audio)
-Capable of output sound to a 3.5mm jack (with a small stereo amplifier).
-Capable of Bluetooth A2DP for comparable sound quality to wired. This is important for me as I have a pair of wireless speakers.
-Play audio files from a micro SD card. Keeps design simple and reduces size.
-Play large audio files (100s of MB) to allow listening to podcasts.
-Main audio format to be Ogg Vorbis because the specification is free and available (https://xiph.org/vorbis/doc/). However, given the components I'll be using, other formats (WAV, MP3 etc.) will be usable too. Additional formats will be a stretch goal.
-Custom shuffle functions. I don't like when my devices recommend a song I already played during the same day. Perhaps having a list on the SD card that shows what I listened to today and not adding anything in that list to the shuffle queue?
-Use on of my existing development boards as a prototype. Contenders are: Raspberry Pi 3 Model B, CHIP, STM32F0 Discovery, ESP32 WROOM 32. I decided against using Arduino based boards so that I got more experience with C programming and to reduce  memory overhead.
-Physical buttons for controlling volume, play/stop, next, previous, perhaps some additional functions. For the prototype I'll use my existing protoboard keypad with 14 buttons available.
-Small display for showing current song, shuffle settings, directory etc. For prototyping I have an I2C OLED display with a 0.96 inch diagonal and 128x64 resolution. Should more than enough for testing.
-At least initially, I will reuse parts that I already have (Li-On charger IC, passives etc.) to cut down on prototyping cost.
-Minimise power consumption by using interrupts, turning off unnecessary gpio, reducing clock frequencies etc. This will be more relevant once I figure out the final set of hardware after prototyping. This is also where Arduino, and Linux based solutions may be unsuitable as they have a lot of overhead.
-(?) Anything else that I may deem fun or interesting to play with, since it is my device after all!

Once this device gets closer to finalisation, I will aim to use parts that are:
1. Readily available.
2. Have datasheets and all bootloader information available.
3. Will be produced for a long time.
I'll approach the design from a modular perspective, to allow parts to be replaced with minimum hassle if any parts from my original BOM go out of production etc. In addition I'll include debugging pins and ways of bypassing sections (such as the audio amplifier, bluetooth chip etc.) to allow straightforward replacement of sub-systems.

Monday, 8 July 2019

Pipe Post-Script

The end of the big engineering project came and went fairly swiftly, but not without a few fairly long experiment/analysis/writing sessions to finish it off. (It wouldn't be a proper project without them ... riiight??)

The result was that my visions of a brilliant new way of detecting pipes was only partly correct. The final experiments involved sweeping the antenna in front of a pipe, which had been hidden behind a very large wooden board. The pipe could be clearly seen in the reflection data and with a bit of processing the peak in reflected power could be made rather significant.

The pipe is causing that ripple!

And with a bit of manipulation of the underlying phasors we can make the peak magically appear!
Unfortunately the usefulness in the reflection data for distinguishing pipes and non-pipes was not tested (a year is a remarkably short time in the end). Looking at the initial goals for the project - they were all met, the method was tested in the ways proposed and experience in how the data generally worked allowed me to build a schematic of the pipe detector!

Inevitably the question after every project is what next? - well I think it is time for something completely different...

Thursday, 20 December 2018

Phasor Phun


So, turns out I had forgot one of the more important parts of a VNA's function, that it outputs Phasor values, that is vector-like quantities with defined phase and magnitude used to represent sinusoids.

Related image
Sadly not our favourite Star Trek ray guns...

So why do we use this form of data?
  1. The VNA is already providing information in a frequency sweep - every data point represents a sinusoid of a specific frequency.
  2. A sinusoid can be represented with three bits of information, its frequency, its magnitude and its phase offset.
  3. Therefore, given we already have frequency we can easily store the other two bits of information as a phasor and be quite happy!
  4. Phasors lend themselves quite well to multiplication/division operations - addition/subtraction is achievable after a simple conversion to rectangular (Cartesian) coordinates.
Of course to simply represent our two quantities as two different elements of a vector would be too nasty - we use imaginary numbers instead, in exponential form.

This realisation gives me the opportunity to work with way information than before. By taking phase into account when comparing two signals we can identify more properties to identify them, for instance phase differences, or absolute magnitude differences.

Clearly at this point I am sitting on top of a folder bursting with graphs (3D graphs!!), however they need a bit more work before anyone but me will understand them so I will save them for later...

Thursday, 29 November 2018

Further Engineering Excitement

 So a follow on from the previous post, mainly because I ran a second set of tests, but this time transmitting around 10GHz.

As before I hooked a nice polarised antenna up to the lab VNA and moved a pipe around in front of it, while looking at the power reflected into the VNA from the antenna (and calibrating out the power literally reflected by the antenna itself to try and isolate the reflections due to the pipe). Of course being 4th year engineering means that all of this is automated after the initial setup!

I had a few predictions about this second set of tests:
  1. Our lovely dominating sinusoid (the one with the increasing and decreasing reflectivity) would increase in (spatial) frequency to match our increase in RF frequency.
  2. The sample would induce a greater reflection as its size (in RF wavelengths) was now bigger.
  3. The tail end of the previous reflectivity graph started to look flatter, I was expecting this flat region to develop earlier on in the graph
Of these only 1. turned out to be true, the increase in size relative to wavelength of the sample appears to have been swamped by greater path loss, the radiation losing energy as it travels, which is greater at higher frequencies. Additionally the flat area did not appear, making me suspicious that its manifestation in the earlier graph was an artifact of me 'under-sampling' the distance/reflectivity waveform.

My pipes at this point were about a wavelength wide (as opposed to the half-wavelength width they have for 5 GHz waves) which has another important part of the test as my trusty textbook had illustrated that the reflectivity properties change around this point (and a bit lower). This appears to have been observed, certainly the PVC pipe appears to now be reflecting more power when it is horizontal, earlier it was reflecting marginally more when it was vertical. The metal pipe appears to be reflecting equal amounts of power independent of its orientation - which is interesting and requires further investigation...

Anyway, the results graphs:

Reflectivity Graph, now pointier...
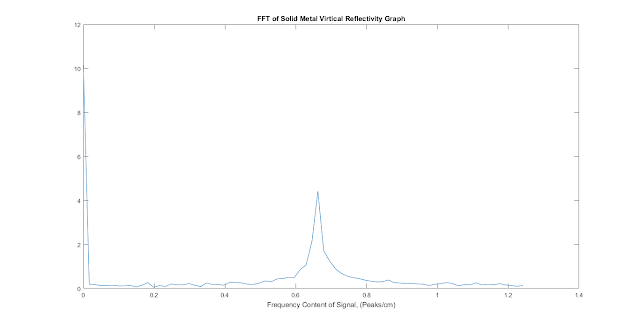
FFT plot, also pointier
One of the brilliant bits about these experiments is that they produce megabytes of information, the two graphs here only use a fraction of the data produced. This means that there are many, many, many different ways the data can be displayed and different properties that can be explored ... brilliant news for at-home-playing-around-in-matlab me!

Thursday, 22 November 2018

Engineering Excitement (or: more MATLAB graphs and FFT fun...)

So, end of the degree means that some fairly cool research gets to be done to produce a thesis. My project has ended up being trying to explore the effects of a cylinders orientation with respect to RF (Radio Frequency electromagnetic radiation) wave polarisation on their RF reflectivity. A bit of a mouthful that ends up with: can I find a method to detect pipes really easily? If I can that would be really useful for the construction of pipe-detecting devices. The really cool bit was that initial research indicated that dielectric (non-metal) cylinders also exhibited properties along these lines, which is really intriguing, and could represent a massive improvement over current methods of pipe detection.

So a couple of months of reading and simulation later I found myself in the lab collecting data from a physical experiment, the results of which are below. For this test I had a plastic and a metal pipe which I rotated between vertical and horizontal in the testing apparatus. My investigation had indicated that 
Data!!!!
This graph shows the approximate power reflected from a set of sample cylinders at varying distances from a test antenna hooked up to a VNA (meaning I was actually looking at the total power reflected from the antenna).

Two points, firstly I can be fairly certain the figure above shows power reflected due to the samples as there is another set of data that was collected with no sample in the testing apparatus - this established how much power was being reflected from (and into) the antenna under no-sample conditions. This power was subtracted from the result of tests when there was a sample to give the result displayed.

'But Wait!' I hear you say, 'you have negative power over there!'. I have cheated and used a dB, logarithmic, scale to display the results. Negative readings actually indicate that less power than the no-sample test was reflected under these conditions. This is due to RF wizardry, at these points the sample has put itself somewhere where it can absorb lots of power (or lead to it not being reflected into the measurement device), rather than reflecting it (into the antenna where hopefully the measurement device can detect it). This is a combination of the sample 'coupling' with the antenna, changing its characteristics, and it being close enough to provide an effective load to the transmission line the antenna is attached to! (I did say wizardry)

Secondly, the y, distance, axis is approximate - there is some offset which I have not accurately measured yet, unfortunately Lab-Me only took down a rough measurement! Additionally it is the nature of a lot of RF work that there is a certain level of roughness to results. This is mainly as the measurements we take are affected by all RF radiation waves being thrown about, including are own, that like to interfere with each other, themselves and reflect, refract and diffract off of whatever they can. This leaves us with a non-trivial system that is always going to have an element of randomness simply because we cannot predict everything that is going to be important to the behaviour of the system. The best that can be done is to try and calibrate all of our measurements to a baseline and then not change the test environment if we can help it. This is why the measurements all look very messy - luckily this data set represents about one of 640 (from this experiment alone) I can use to help reveal how the effects I am looking for are affecting the system! Additionally I have another antenna set made up able to look at a different set of frequencies (these tests were conducted at about 5GHz).

I got really interested in the oscillations in the data so, naturally, I ran a quick Fourier transform on the data to uncover its frequency content. Note that this frequency is separate from the frequency of the RF operation, it is actually the frequency of reflective peaks over the separation distance.

MOAR DATA!!! (ignore the vertical scale)
Unfortunately for those trying to avoid confusion, the frequency plot shows a definite peak at just over 0.3333333 Peaks/cm, or a wavelength (distance between two peaks) of just under 3 cm. Why is this interesting: because the wavelength of the RF radiation used to produce this graph was just under 6cm! In other words the sample reflects the most power when the sample-antenna separation is some multiple (plus an offset) of half the RF wavelength!

It is always nice to get results that indicate more investigation is needed!